- Author: Sophiea Ank
Date: Oct 12, 2021 - Category : Video Production


Learning is a part of a human’s life cycle, and they keep learning from toddlers to their late sixties. Every day people learn something new and implement it.
But….
How do they learn? What do they do?
Book? Ok. Video? Yes!
People learner faster when someone dictates or elaborates something to them. And trust me, you are not alone who love to watch videos.
According to research, people prefer watching 71% more videos compared to the last year, and 50% of the viewers look for the product or service-related videos before buying the product or subscribing to the service.
To understand the complexity of a product, it is essential to watch the instructional video(s). it helps you to understand the concept more effectively.
Despite of which industry you are in or what purpose you serve – instructional videos are the best choice for delivering a concept, teaching a skill, or training a person.
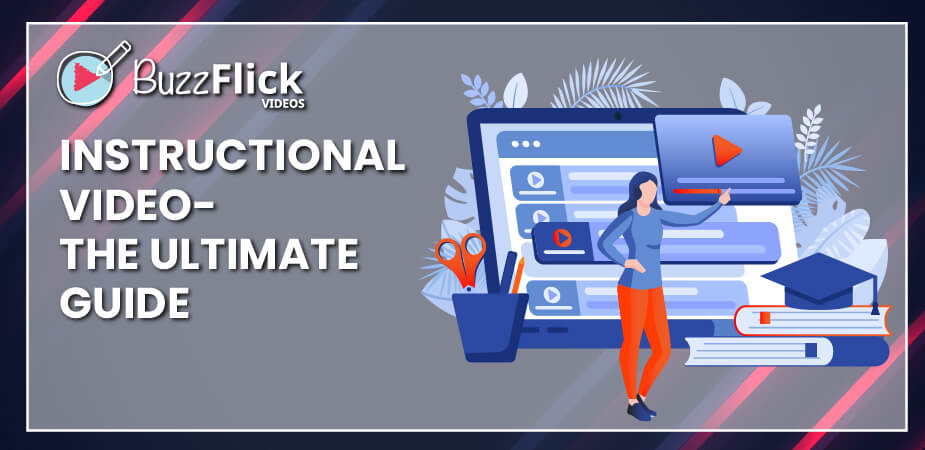
This ultimate guide will take you on a tour where you will get every single detail and learn about “instructional videos and how much it is important.”
After digitalizing knowledge, people usually turn toward video when they get stuck into something or want to learn about it.
There are some facts about videos:
There must be a thought roaming in your head that if instructional or training videos are that useful, so how to create one?
It is challenging for people who have zero knowledge about creating a video and might consume hours to make one. But this guide will help you create a video step by step and make it a lot easier for you.
After deep research, this guideline has been designed to teach rookies how to create expert and HD quality training videos. We have gathered all the information that you need before start making a tutorial video.
Our guide will help everyone, whether you are a teacher, business person, student, trainer, or company. So, keep reading it!
We have divided the guide into five sections to make you understand everything thoroughly, and at the end of this informative guide, you will be able to create your own training video(s). We will be highlighting:
Any video that provides some information, demonstrates a mechanism, elaborates a concept, or teaches how to do something is called an instructional video.
Instructional videos are essential for every field of life. It is not just related to the people who teach, train, or instruct. It is needed to know things properly and deeply.
Take a look at the following types of instructional video you can choose to create:
To teach a topic or a sub-topic, a short instructional video is made called micro-videos. These videos are relatively short and just focus on the topic for 30 to 60 seconds.
A 3-10 minutes long instructional video that teaches a method or instructs a step-by-step process is known as a tutorial video. The “How to do” video is the best example of a tutorial video.
Tutorial videos are used by teachers, companies, and service providers to teach viewers things in sequence.
A training video is usually used by companies to train employees. Companies create a training video playlist and upload it on the internet or company servers so that whenever any employee wants to refresh the knowledge or needs help, they can rewatch it.
A training video is an interactive video where the trainee connects with the defined concepts of the trainer. These training videos can be used to educate small groups and large audiences. Teachers, artists, and chefs can also use training video courses to train their viewers.
Explainer videos are less than 120 seconds short video clips used to explain a business idea, product features, critical topics, and complicated concepts.
Explainer video production company uses 2D animation to make the explanation more attractive and engaging. The explainer videos break down complicated concepts into easy and understandable pieces of information.
Presentation videos are recorded presentations for people who may not have attended the event or conference so that they can review the presentation anytime. You can record a presentation for later use.
Many applications and software are available to record the audio along with the screen recording in high quality.
Screencast videos are digital screen recordings with audio to show what is happening on the presenter’s computer screen. It includes presentations and tutorial videos.
The presenter trains the viewer about a topic and teaches tricks to perform a task in a particular way. Coders and programmers use this technique to educate beginners on how to code and what command will be used to perform tasks on the computer.
While making instructional videos, people usually make some common mistakes, and to avoid them, here are a few lifesaving points:
Before making a video, you should know who you will be communicating with. If you have confusion about your audience, it will become challenging to make the right helpful video. Learning about your audience is the first step of video making.
If your video is on the internet or any social media website, then it is possible that an audience of all age groups might be watching it, but you surely don’t want to miss the viewer your content is actually about.
So, think about your viewers, learn their problem, add elements to your content that makes them watch, and there you have it – a complete audience analysis.
If you keep perfection in your mind, it will lead you to the flawed work. Try to be creative, put ideas, aim to teach a lesson, or create catchy content. Try to focus on the topic and explanation, and it will automatically fix the gaps and make it perfect for watching.
Gadgets can surely bring massive differences into video making but do not rely on it. Even with simple tools and devices, great video content can be made.
First, learn to make a video then upgrade the equipment. Making a great video does not require high-profile gadgets –unique content, perfect shoot, proper editing, and you have an excellent video.
A few years before, people did not have the idea that they would be making videos for their jobs, but it is essential to make like the computer is a part of every field of job.
People make the video for the first time and do not have a video-making plan, then this is the point where people make a mistake.
Everything requires planning so do videos.
To make a tutorial video plan, keep the following key points in your mind:
Learn about your audience and how your video will be helping them.
If you offer a service or product, know your customers what they are facing, and think how your product video will help. If you are a teacher, know where your students are struggling and how your video will make them learn fast. If you are a company, know how to train your employees to be productive, and your video will help them accelerate.
Choose your topic according to your audience and make sure that your video will resolve all your audience’s queries. Get straightforward answers to these questions:
After finalizing the topic, start creating a storyboard to put your ideas in the visual format and for a better understanding of what to show to your audience.
Stick figures and characters can be used to display your idea, and with narration, it will explain how the audience’s need will be fulfilled.
You can use images or animated characters to define the topic with storytelling or narration for screencasts and presentations.
After finishing the storyboard, the next step is scriptwriting. A script is a demonstrative document with instructions for artists, actors, creators, and directors.
The script contains graphics, sound effects, dialogs, and visual information. In short, the script is the road to your destination – a perfect video.
Scripting helps you to deliver the message to the viewer in a clear and understandable way. It eliminates the ambiguity and confusion for the creator as well as the viewer.
Before starting the scriptwriting, here are a few points for you:
Now it’s the time to record!
After scriptwriting, the next step is recording. You give your script to the voice-over artist to perform vocal action with your script. There are many audios and screen recording software that you can use for your project.
Camtasia, Adobe Audition, and Bandicam are liked mainly by professional video creators and makers. These audio software are easy to use and easy to learn. Some can transcribe your recorded voice and make it easy to edit like a written document.
Go to the studio or a noise-proof room to make audio clearer and more audible while recording the voice. Start reading the script and when a mistake happens, just pause the recording, then start recording again right before the mistake happened.
P.S: Do not start over; relax mistake happens and instead, to make a mistake-free one-go shot, adopt the pause and edit technique to save your time. And once again: Mistakes happen.
Screen recording is the most crucial part of the recording. Must follow the following point before hitting the record button.
Some video creators add webcam recording to screencasts to make instructional videos more engaging and interactive. Just like audio, if a mistake happens, just pause the video right there and start recording from before the error part.
P.S: if there are some disorientations, do not worry! You can fix it at the editing part.
After finishing the video recording, you must review the video along with the audio.
Place the video on the editor’s screen and play. If you find any need editing, then just click cut and trim it. You can also remove the unnecessary footage from your recording.
Once you are done with video editing, add audio to it. To synchronize the video and audio together, you can use extend frame and clip speed in your video project.
Here are some tricks and techniques you can use to make the video look more like a single shot rather than a collage of edited clips:
A video intro gives a glimpse of the video content to the viewer. A good video intro saves the viewer’s time and adds more interest by having a precap of the video. With a video intro, you can show your viewer what they will learn through this video.
For a video intro, make a space at the start of the video and add a clip or playhead. You can add a color scheme, theme, or music to the video intro to make it eye-catching.
As we are talking about instructional videos, try to make a positive and motivating video intro to make the viewer feel good and make the video look fruitful.
Note: Make learning enjoyable by adding animation to it.
There are many online video platforms where you can share your video content. You can post your video on your channel, company server, website, or social media platforms.
Most people seek to learn from YouTube more than searching on Google, so if you post your instructional video playlist on YouTube, it has up to 70% chance that relevant viewers will visit your channel and watch the video.
Video feedback is vital before posting it or going live. Send your video to the teat viewer to get feedback and reviews. If anything needs to be fixed, you can fix it before the world knows.
Training videos made by a camera or by screen recording are almost the same. You will be needing a video plan, storyboard, scriptwriting, camera, editing tool, and video intro, but this time you will have to face the camera.
To make an instructional video using a camera, you will need some equipment:
Start setting up the recording room and make sure the room has the perfect lighting. Adjust your camera on the tripod to cover the required space and try to remove unnecessary probs or items from the camera frame.
If you are recording from the smartphone, try to keep it close to the artist to keep the audio and video clear, and if you are covering a wide-angle, then use long mics to record the audio accurately.
Try to keep a plain background or keep your channel/company logo on it. Make sure that background must be dark so light should not reflect towards the camera lenses.
The storyboard and script will help you through the video, and after recording must take a viewer review before posting it on the internet because feedback matters and help you fix the flaw on run time.
Make a finance list before starting your video project or hiring a video production company to get it done for you. Knowing the cost and expected expense is the most important thing, and you should know that you will get quality work from the company you are hiring.
Your budget matters the most, and you should ask yourself some questions before hiring the video production company:
Think at least twice before investing your money in a video production company. To skip the lousy work and save time from the inexperienced companies. Look for those training video production companies that are best in their work and give reasonable prices of their video production services.
Suppose you are a company and going to train employees. In that case, you must need a professional hand for making instructional videos, and video production companies can make you outstanding videos that can help your viewer in education and boost your marketing campaign.
And if you create a training video yourself, then it gives you experience and control over the video process. You can easily add and delete or modify with whatever you want and whenever you want.
With some little experience of handling camera and screen recording software, you can actually create a complete how-to-do video series. Most YouTubers do create videos on their own, and it is really great.
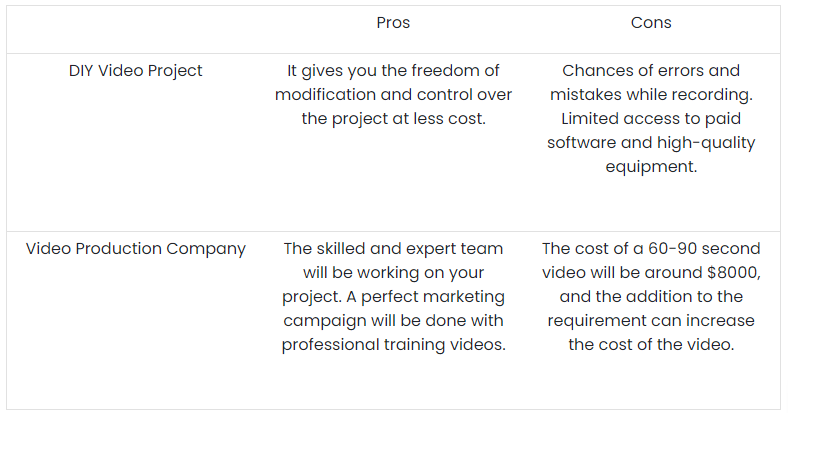
If you want to create an engaging and exciting learning experience for your viewer, then you should hire a video production company because a company knows how to put things in the correct order to achieve the goal.
To give a professional look and premium quality to your instructional video, you must consider hiring a company with quality service and affordable cost.
We suggest you BuzzFlick – an animated video company that has excellence in animation, explainer video, educational video, training video, whiteboard animation, logo animation services, and video editing service.
The studio has been working in Houston, Dover, and New York and has received many awards due to its fantastic 2D animation and explainer video projects.
The duration of the instructional video depends upon the topic of the video, but most viewers prefer 60-90 second videos. You should consider the topic and type of audience then create the video accordingly. The instructional video can be longer up to 25 minutes.
Want to grab the attention and eyeballs of your audience? Use these cool video effects in your videos and make them look amazing
Read More
Get A Custom Quote Now
Copyright © Buzzflick 2026, All Rights Reserved.
Get Video Animation at Reasonable Prices at BuzzFlick! Get A Quote!