- Author: Eich Eyf
Date: Jul 7, 2022 - Category : 2D Animation, 3D Animation


The use of animated GIFs in advertising is highly recommended. They may have a profound effect on the viewer emotionally, are simple to digest, and offer a fresh method to grab their attention.
As an added bonus, creating a GIF doesn’t take much time or effort. An animated GIF can be made in a matter of minutes with Photoshop and some spare time.
Today in this guide we’ll demonstrate how to create an animated GIF on Photoshop. This tutorial was created in Photoshop CC 2015; however, the instructions should be comparable to previous versions of Photoshop.
If you are already familiar with the process of making a GIF, you can move forward to the section on incorporating GIFs into promotional materials.
See this GIF for an illustration of the kind of animated GIF you could create with the help of this guide.

Okay, I think we’re ready to begin.
So, let’s get started.
So, let’s begin with the images. If you have already created them, simply gather all of them in a separate folder. Now to upload all the selected images into Photoshop, go to File > Script > Load Files into Stack.
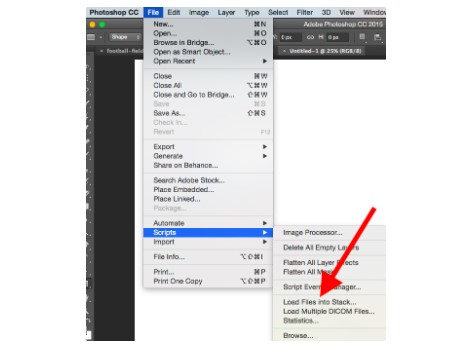
Once you have done this, go to the Browse option and select all the files you’re planning to use while creating your GIF. After selecting, hit the OK button.
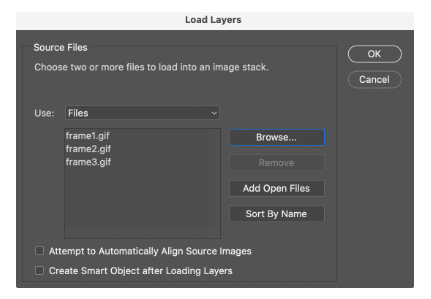
This will instruct Photoshop to create separate layers for each selected image. If you have successfully completed this step, then we recommend skipping step 2 as it’s for the users who have not created their own series of images.
If you haven’t created the series of images you want to use in your GIF, then follow this process.
Begin with creating a separate layer of each frame to make the animated GIF. To add new layers in Photoshop, go to Layer > New > Layer.
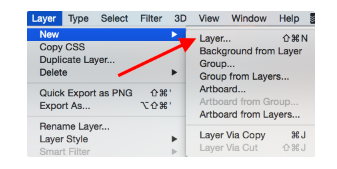
Bear in mind that you have to name each layer you have created so you can easily track them when you’re making your animated GIF on Photoshop.
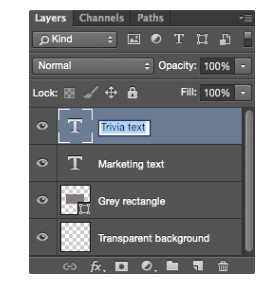
If you don’t know how to name each layer, simply hit the Layer Panel, which you will find at the bottom right. Now double-click on the default layer name. Erase it and add the name you want to give to that particular layer. When you’re done, just hit the Enter button; that’s it.
Now, when all the layers are in place and you have named each layer properly, you can move on to step 2 of this process.
Useful Tip: If you want to lessen your work and merge all the layers so they appear in a single frame, then you have to turn on the visibility of all the layers you wish to merge. You can do this by simply clicking the eye, which you will find on the left of the name of each layer. The eyes will open to the layers you want to merge.
Next, to create the layer that will have all merged layers, press Shift + Ctrl + Alt + E (Windows) or Shift+ Command + E (Mac). Don’t forget to rename this layer as well.
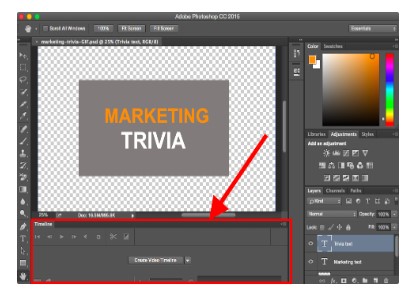
Now go to the top navigation bar to open the timeline. Click on Window > Timeline. This option will allow you to turn it on and off differently for different time frames, which will ultimately turn your static image into a GIF.
Next, you will see the Timeline Window at the bottom of your Photoshop screen. Take a look at the image below to witness what it looks like:
Here, we are learning how to create an animated GIF, so first, you’ll have to select the ‘Create Animation Frame‘ option.
If it’s not selected by default. Click on the menu and select it from the dropdown. Make sure that you actually click it; otherwise, you won’t be able to see the frame animation options to make the animated GIF.
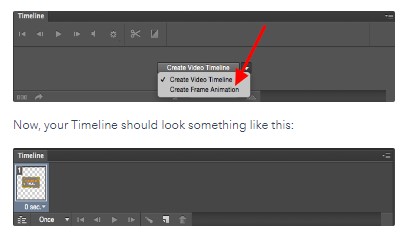
You’ll see a change in your Timeline window. It will look something like this:
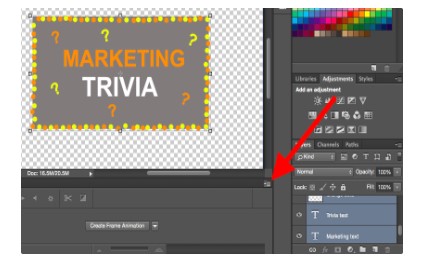
This sounds a bit complicated, but it’s very easy to do. All you need is to go to the top navigation menu and click on Select> All Layers.
Next, hit the menu icon which you find on the right side of the Timeline screen.
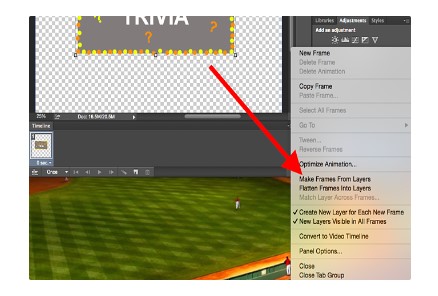
Now find the option ‘Create New Layer for Each New Frame’ and select it.
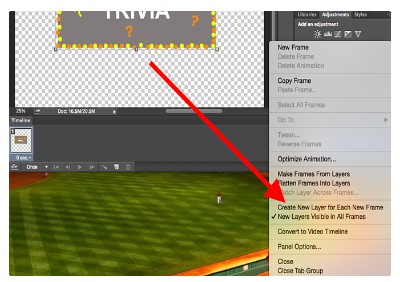
Upon choosing this option, Photoshop will create each layer a frame of your animated GIF. All you need is to select the option ‘Make Frame From Layers’.
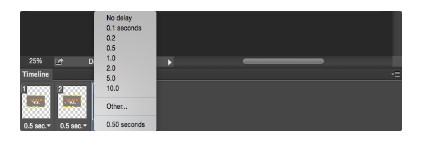
Before you start creating a GIF, it’s important to determine for how long a single frame will appear on the screen. In this tutorial, we’ll keep 0.5 seconds time frame for each frame.
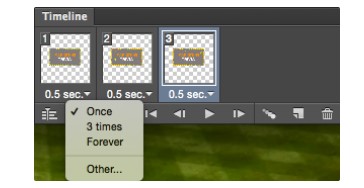
By default, this option will be set on Once, but you can loop as many times as you wish, even Forever. If you don’t want to choose any of the options available, click on Other and specify the number of loops.
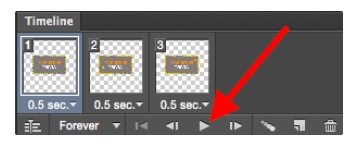
Now to see if your created GIF is working properly, click on the play button to preview it.
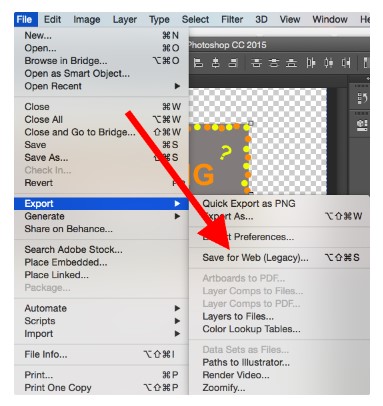
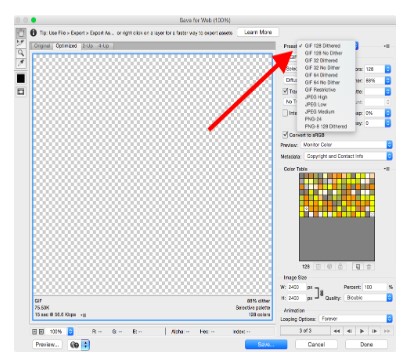
So finally created the GIF you wanted? Looks amazing? Good job! Now, if you want to use the GIF online, you need to first save it, so head to the top navigation menu and click on File > Export> Save for Web.
Now, select the GIF file type from the Preset dropdown menu. If your GIF has gradients, then go for the Dithered GIFs to avoid color banding.
If you have used solid colors in the image, then go for the no-dither option. To see how large or precise the size of the file is, check out the number that is next to the GIF file. In this case, the GIF colors will be compared to the colors of the original images file PNGs or JPEGs.
Next, hit the Save button located at the bottom and save your GIF to your computer. That’s it now. You’re ready to roll!
You can use this GIF anywhere you like. Just make sure it plays without any jerk.
With this, we end our tutorial on how to make a GIF and how to animate it in Photoshop. But that’s not it. In the next section of this blog, we’ll be shedding light on where you can use the animated GIF you created in Photoshop.
There are many places where you can easily use animated GIFs for marketing your brand in multiple ways. Let’s explore some of them together.
Pinterest enabled animated GIFs first, followed by Twitter. And by the summer of 2015, Facebook had joined the GIF bandwagon as well. Then, Instagram altered the game by introducing Boomerang, which allows users to create and share their own GIFs. On any of these social feeds, animated GIFs might be an excellent method to stand out.
Check out how Calm used a GIF of a heart drawing in this Samuel Beckett quotation to bring movement to an otherwise text-heavy Instagram post.
View this post on Instagram
To the recipient of an email, an animated GIF seems like any other image. To spice up your email marketing, try using moving pictures instead of motionless ones.
This might have an immediate financial impact in addition to grabbing the attention of your target audience with its uniqueness.
Some companies saw a 109% boost in sales simply by inserting an animated GIF in their marketing emails. One simple method to achieve this growth on your own site is to use HubSpot’s free email marketing tools.
Use GIFs for advertising your business, draw attention to upcoming events, or intrigue your audience in any other way you see fit. You can win cool stuff from The Hustle just by telling your friends about it, as seen in the GIF below.
Finally, think about how GIFs may be used on websites to attract attention to a certain place or keep people interested in an otherwise dry piece.
In this story about the Beijing Winter Olympics, Bloomberg makes great use of animated GIFs with stick figures.
This was pretty easy, right? But still, you need some prior knowledge to get this job done. Also, you need images you animated GIFs in Photoshop.
Most of you might be thinking that this is a strenuous task and will require a lot of time. If you’re looking for ways to overcome this issue and still get an animated GIF or logo, or even video for your brand, then you can simply hire someone to do it for you.
You can simply hire BuzzFlick, one of the prime Vancouver animation studios offering profound logo and video animation services.
Be it simple logo designing, animated GIFs or videos, 3D animation services, or character designing, and we do it all nothing short of perfection.
Or if you’re interested in animated video and want to learn about its pricing, then give a read to the following resources:
So, did you enjoy this tutorial on how to make animated GIFs on Photoshop? We hope this guide will be of great help to you. We also tried to tell you about ways through which you can use your animated GIFs to market your brand in the digital marketing space.
Cut-out animation is one of the oldest animation styles. Read our short guide to learn everything about cut-out animation with useful examples.
Read More
Get A Custom Quote Now
Copyright © Buzzflick 2026, All Rights Reserved.
Get Video Animation at Reasonable Prices at BuzzFlick! Get A Quote!