Ever watched a Studio Ghibli film and thought, “How do they make it look and feel so magical?” The dreamy colors, the emotional storytelling, and the painterly worlds of Studio Ghibli’s animation style are hard to imitate, especially without a large team or a massive budget.
But here we are in 2025, where AI is shaking up the creative world. With the rapid rise of image-generating models (like the ones from OpenAI), artists and fans are now experimenting with AI to replicate, or at least echo, Studio Ghibli’s iconic style. And honestly? The results are impressive, but also somewhat controversial.
In this blog, we’ll break down how you can recreate that Studio Ghibli animation style charm, using modern tools, smart techniques, and creative storytelling.
Ghibli is the name given to the unique animation style and narrative style popularized by the Japan-based Studio Ghibli that has produced films such as Spirited Away, My Neighbor Totoro, and Princess Mononoke.
It goes beyond images; it is a combination of creativity, writing, and fine details, which makes it unique. There are some fundamental keys to its immediately familiar and adorable look:
Every frame is a painting in itself. The attention to detail in Studio Ghibli’s hand-drawn animation is well-known; the rustling of leaves and shifting clouds, as well as the lively cities and rural landscapes, give life to their worlds. This level of detailing provides an organic and timeless feel that computer budgetary cuts tend to lack.
Ghibli animation films do not simply show nature; they are in love with nature. The forest, rivers, rain, and wind are therefore given a personality and a presence. It can be the green lands of Princess Mononoke or the floating bathhouse of Spirited Away, yet nature is the center of attention.
The characters are often whimsical, or fantastic or mysterious, like the forest spirits or the walking castles, but never less than rooted in the world. There is a balance they have struck in their designs between fantasy and realism without compromising on one aspect in order to create the other.
The palette of Ghibli is soft, natural, and easy on the eyes. The diluting of light, pastel, sand, and earthy colors makes the scenes look dream-like. It is not flashy and oversaturated; rather, it brings a feeling of calmness and nostalgia, serenity.
The emphasis on emotion conveyed in simple silence, whether through a character taking time to savor a moment or in stillness following a significant catastrophe, is arguably the most characteristic feature of Ghibli style. By making these creative choices, viewers of the movie can experience the story instead of just seeing it.
Traditionally, producing a Studio Ghibli-style animation is a demanding yet lovely procedure. The global animation market size is expected to be worth USD 895.71 billion by 2034.
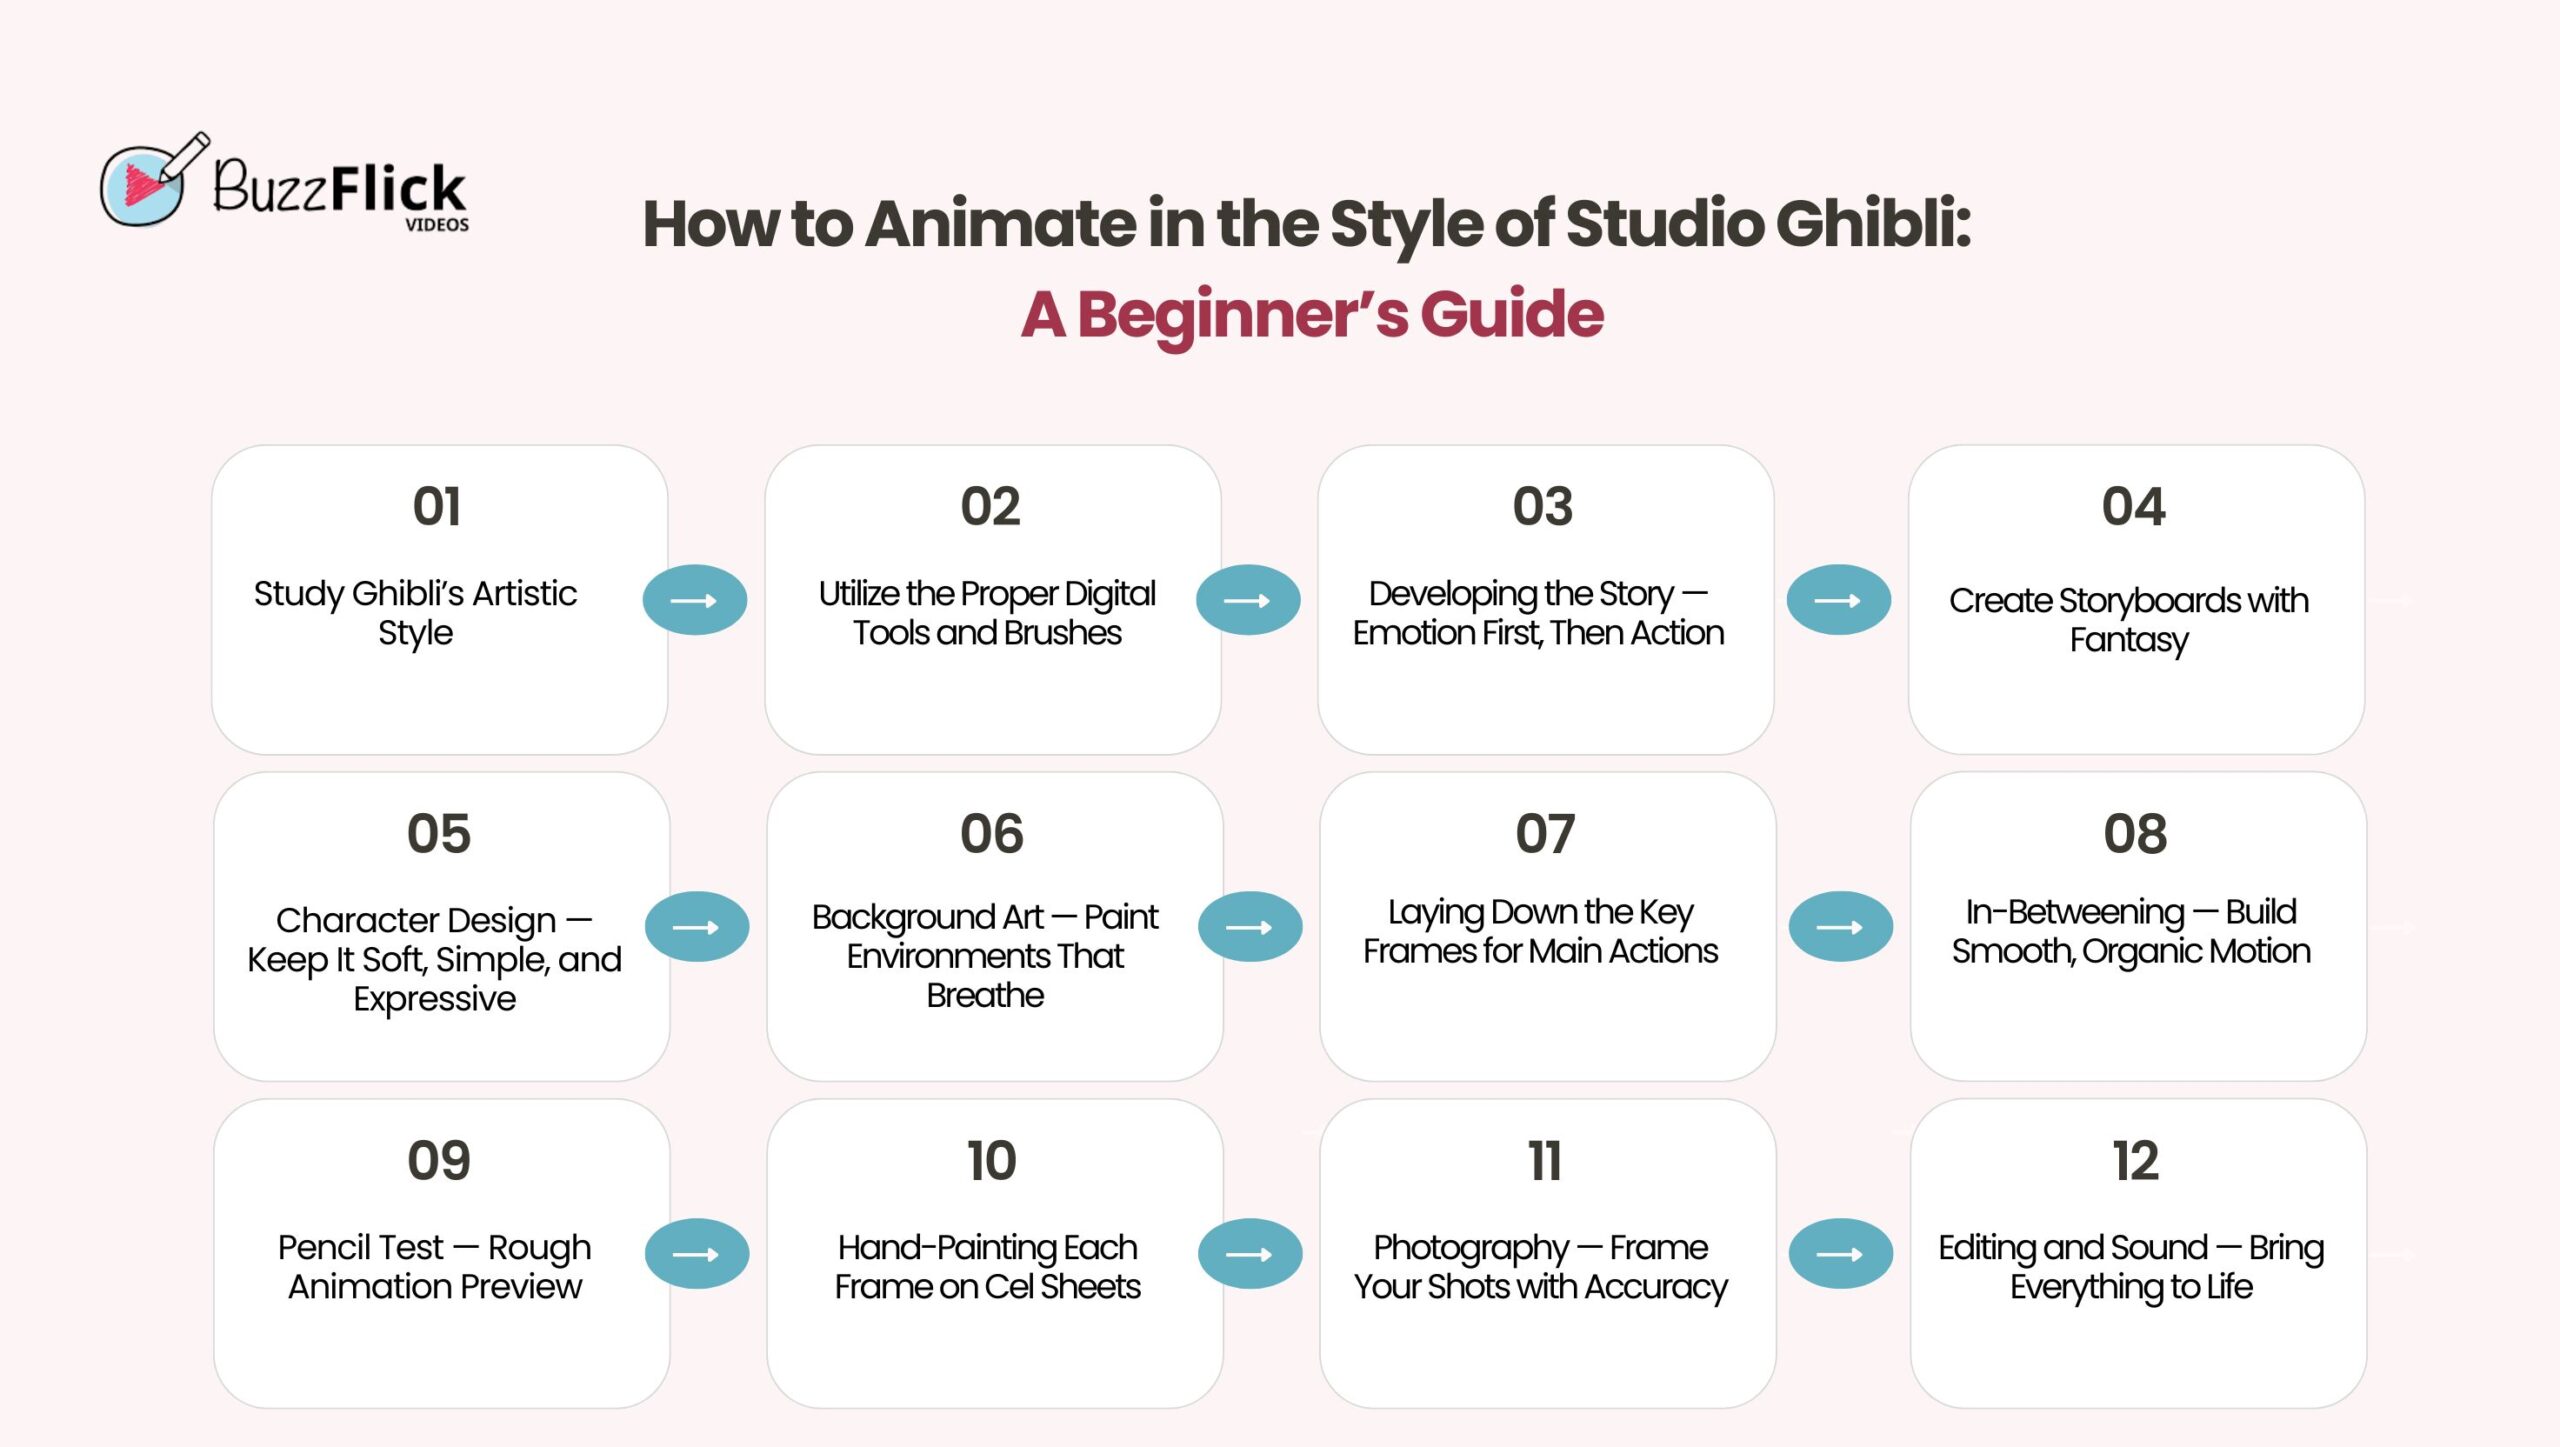
The following are the processes that will help you produce your Ghibli-style animation:
There is no better way to start than to immerse yourself in the core visual language of Ghibli. Study and examine such anime as Spirited Away, My Neighbor Totoro, and Princess Mononoke with a critical eye:
In order to capture the texture of the traditional art of Ghibli, use the tools that allow for the use of the hand-drawn style:
Working digitally won’t require you to sacrifice the organic feel; it’s all about how you use your tools.
Ghibli stories are full of emotion, character-based, and often center on regular existence imbued with delicate magic. Begin by writing a brief story or concept exploring a topic you genuinely care about.
What to Do:
Pro Tip: Watch My Neighbor Totoro or Kiki’s Delivery Service to understand how Ghibli creates tension without a traditional villain.
Storyboarding is the link between script and animation. Storyboarding lets you organize visuals, pacing, and emotion. Storyboards are famous for their scene composition and artwork quality.
What to Include:
Pro Tip: Work with gray pencils or light inks to keep storyboards clean but editable, and don’t overfill the frame with details.
Character designs in the Ghibli films are never too stylized. Rather, they are realistic, warm, and respond to the environment around them. You ought to make model sheets in order to keep your animation consistent.
What to Design
Pro Tip: Maintain features loose and proportions normal, don’t overdo it on the anime look. Look to Chihiro or Sophie for inspiration.
Ghibli backgrounds are hand-painted masterpieces. They’re not just backdrops but living, breathing parts of the story. You’ll be using watercolor or gouache to bring these settings to life.
Tools and Techniques:
Pro Tip: Don’t hurry backgrounds; they set the tone. Check out Whisper of the Heart to learn how setting mirrors emotion.
Key animation is the building block of your animated sequence. It consists of the main poses or actions that establish a scene. Each drawing is created on animation paper over a lightbox.
What to Focus On:
Pro Tip: Emphasize natural gestures such as blinking, breathing, and changing posture. These small moments create realism.
After preparing the key frames, the in-betweens (“tweens”) are sketched to smooth the motion. This process creates filler drawings to provide continuity.
Steps to Take:
Tip: Utilize a flipping technique (flipping 3–4 pages quickly) to determine if motion comes naturally before continuing.
Do a pencil test before final inking and color commitment. This way, you can catch any motion problems or unnatural timings early.
What You’ll Need:
Pro Tip: Insert a temp soundtrack or simple SFX to gauge the emotional flow.
This is the most legendary aspect of traditional animation, applying drawings to transparent cels and hand-painting them.
How to Proceed:
Pro Tip: Employ thick coverage paints, particularly for clothing or solid objects. Apply layer to light, then dark.
Each background and cel needs to be built up and photographed frame by frame on a rostrum camera rig.
Setup Necessities:
Pro Tip: Take a few test frames first and adjust focus, brightness, and position.
Now it’s time to put visuals, music, and sound together to finish your Ghibli-style movie. This is your last stage.
Tasks to Finish:
Tip: Don’t hurry editing, Ghibli frequently leaves deliberate pauses and silence to allow scenes to catch their breath.
Struggling to Capture Ghibli’s Visual Magic?
We fine-tune every frame to bring that storytelling warmth to your animation.
Let Us Handle the Animation!
Making Studio Ghibli animation is now within reach due to the increasing capabilities of AI software. Whether you’re a future animator or creator, you no longer need an entire production company to create that whimsical Ghibli magic.
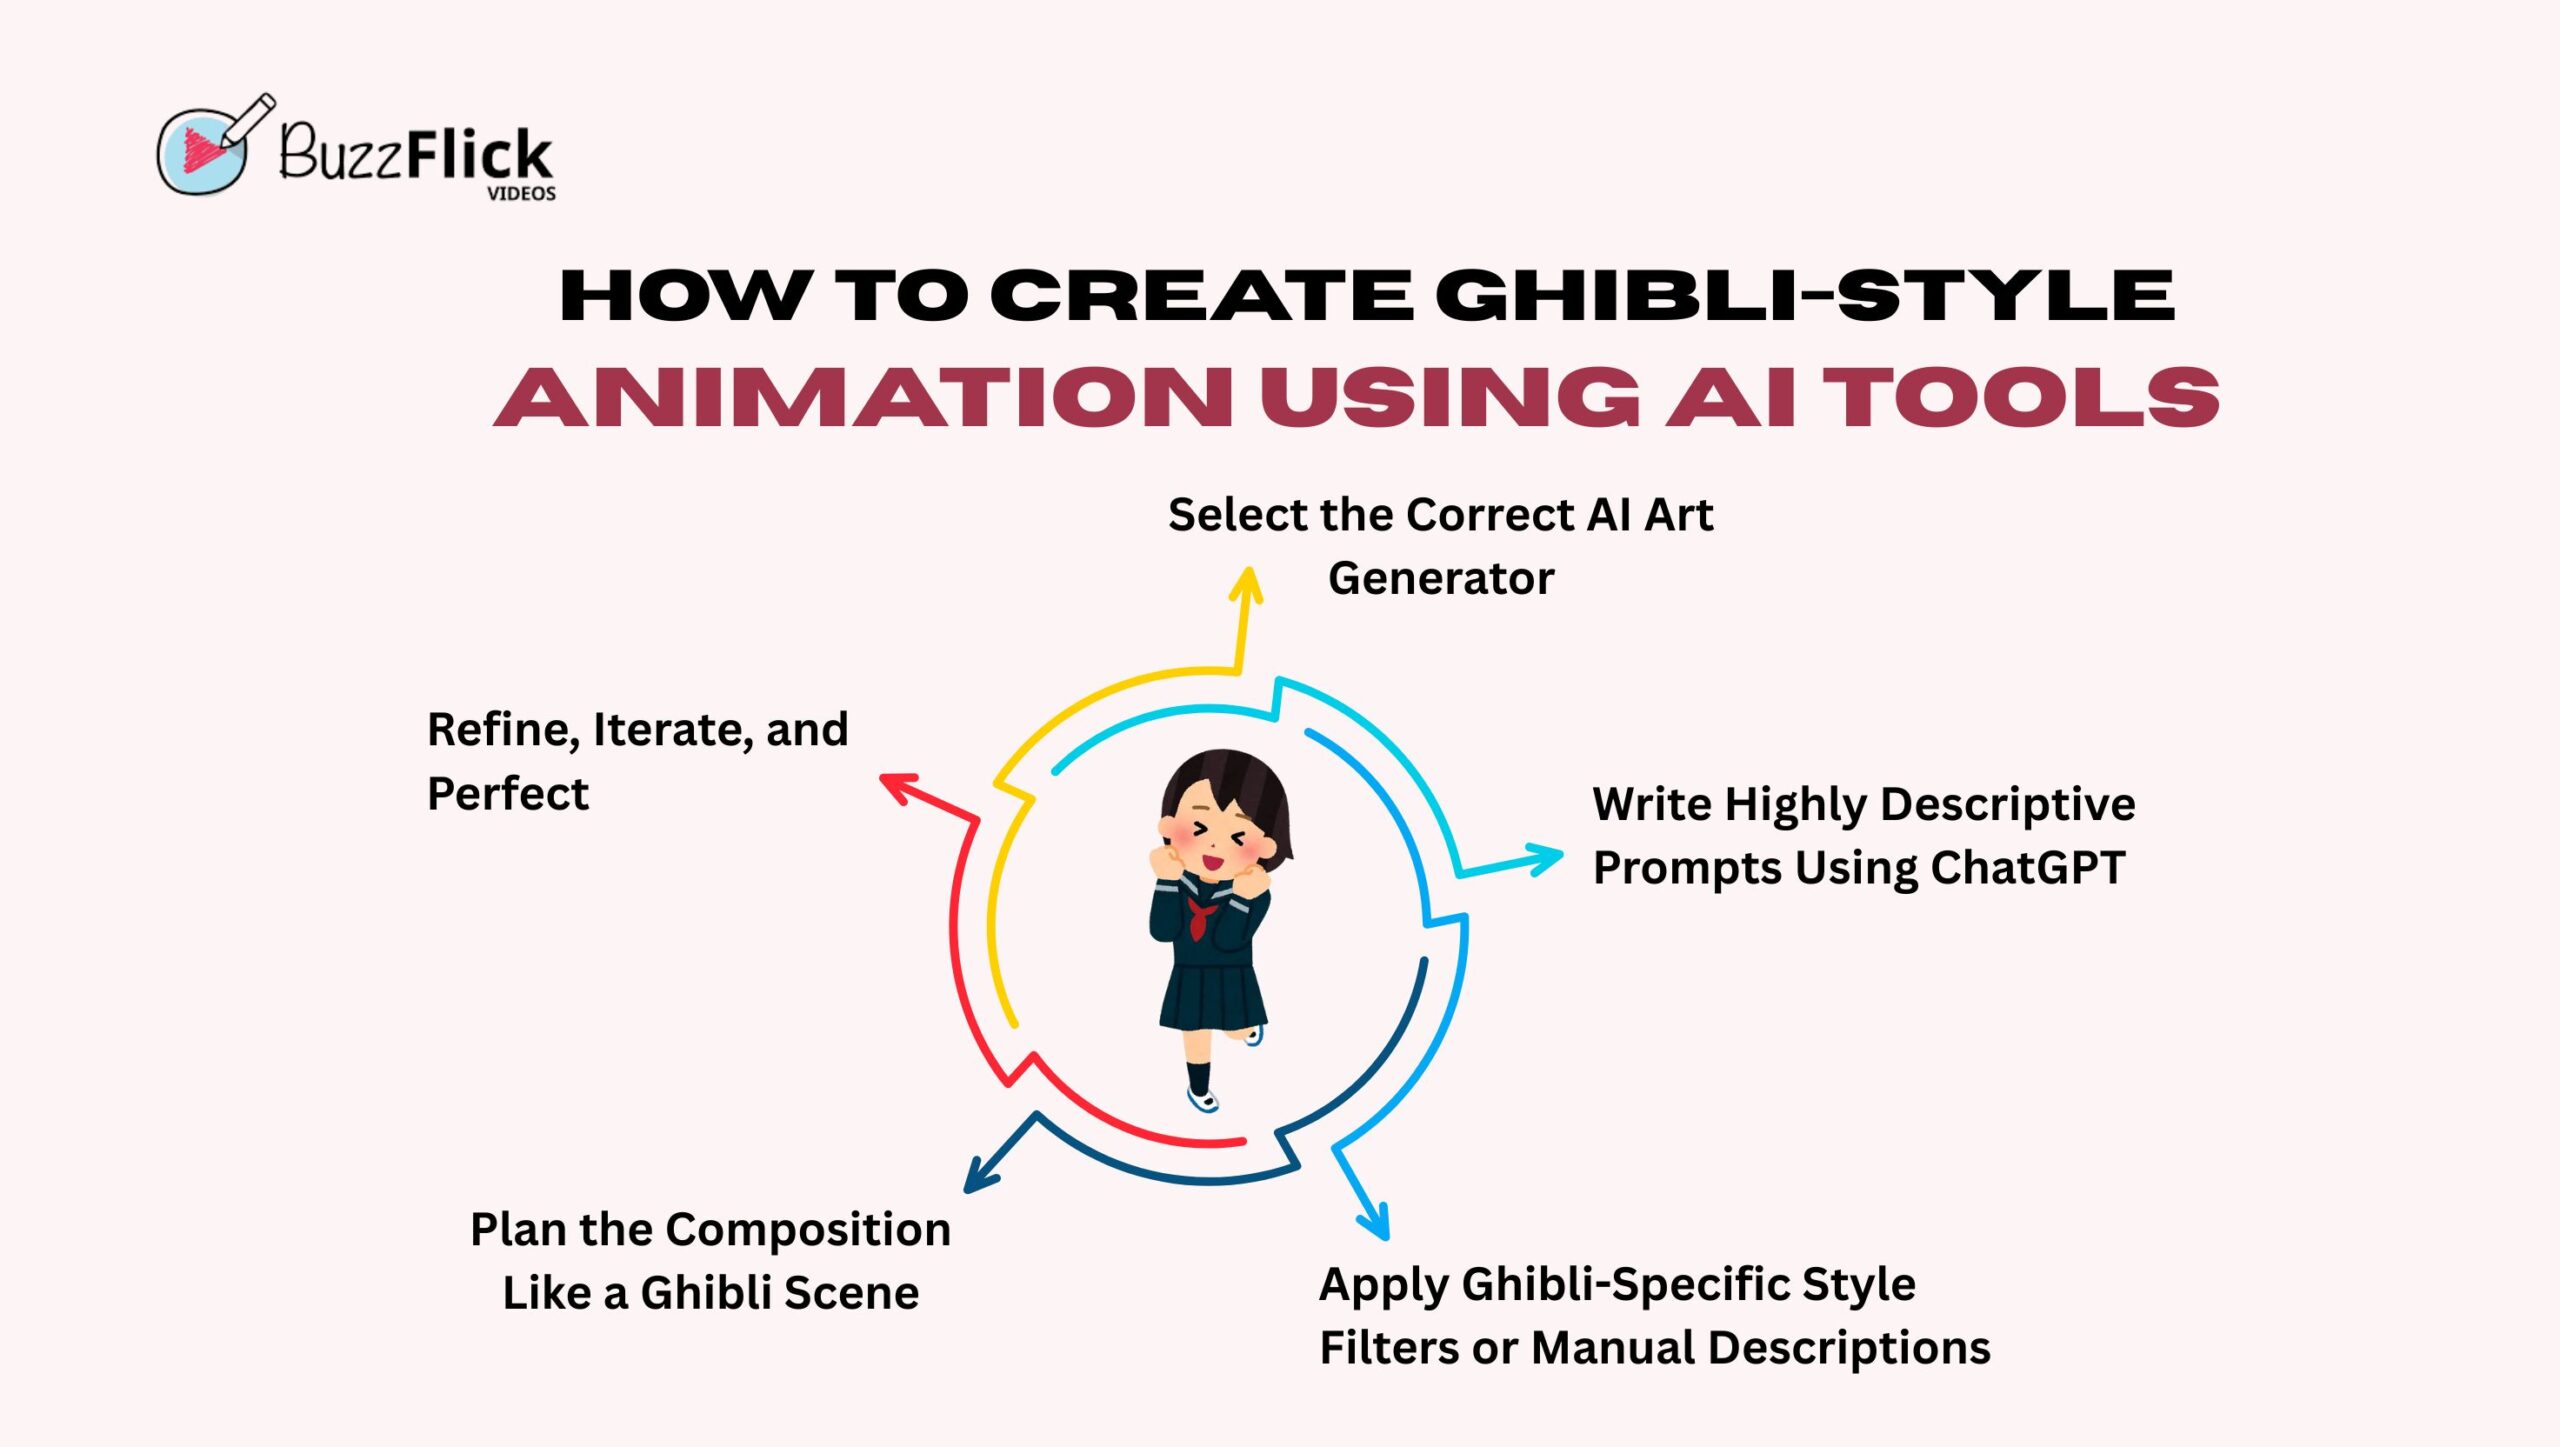
Below are the steps you can take to produce Studio Ghibli-style animation using AI applications:
You can’t begin building your ideal Ghibli universe without the correct tools. AI art generators interpret your written descriptions as pictures, and some work better than others at matching and recreating the classic, painterly styles of Studio Ghibli.
Suggested Tools:
Pro Tip: Search for sites that enable “style tags” such as Studio Ghibli, anime style, or hand-drawn look for more accurate results.
The essence of any AI-made image is in the prompt. This is where ChatGPT can come in really handy. Rather than typing generic wording such as “girl in a forest,” ChatGPT can assist you in elaborating that into a detailed, creative prompt.
Employ ChatGPT to craft prompts such as:
A little girl in a red cloak at the misty forest, amidst softly radiant spirits, with hand-painted watercolor textures, warm lighting, and golden warm glow at the back — in Ghibli style.”
More Effective Prompt Tips:
Some tools come with preset style filters. Use them if available. If not, describe Ghibli’s aesthetic in your prompt manually.
Ghibli Style Traits to Use in Prompts:
The power of Studio Ghibli is its solid cinematic compositions. Utilize ChatGPT to compose the layout of your prompt with framing in mind.
Ideas for Composition:
AI art is not perfect the first time around. More often than not, your initial outcomes will be there, or thereabouts. This is where refinement comes into play.
Here’s how to make your output better:
With increasingly sophisticated AI software, the web is experiencing a storm of Studio Ghibli-style artwork created using automated models. But how does it differ from the original, hand-drawn animations we adore? Let’s dissect.
The beauty of Studio Ghibli is its hand-crafted nature. Each frame is made by artists who work for years to master their craft, painstakingly drawing, painting, and animating each scene. This process by hand brings:
Each drawing bears the imprint of a human’s decision, intuition, and feeling. That’s something computers can’t do.
AI-synthesized Ghibli-style artwork can appear breathtaking at first sight. It copies the colors, backgrounds, and character designs quite closely. But it’s usually generated by:
The outcome? Gorgeous pictures, yes. But they seem flat or over-polished. The lack is the depth, emotion, and storytelling that is introduced by a human touch.
AI software is able to make Ghibli-type imagery in a matter of minutes. Traditional animation, on the other hand, consumes months, or even years, of group effort. This disparity in process results in quite dissimilar results:
| Traditional Animation | AI-Generated Art |
| Time-consuming but rich in detail | Fast but often lacks nuance |
| Created with intention | Generated with prompts |
| High skill and experience needed | Easier for anyone to access |
There’s also a continuing debate about originality. AI draws from past datasets, most of which contain copyrighted or artist-created material. That creates some questions of ethics:
These are more than legal issues; they’re cultural issues, as well.
Producing Studio Ghibli-type animations, be it the old-fashioned hand-drawn methods or AI-based software tools, is all about capturing the spirit of storytelling, emotion, and visual poetry.
You are enabled in all the aspects of artificial creativity: the machine can help you do the robotic parts of the creation process, but it is the imagination and creative intent of the artist that endows meaning to any given frame.
And if you want to bring your Ghibli-inspired dream to life as a complete animation, BuzzFlick is here to help. As an animation studio with a passion for creative storytelling, we focus on bringing emotionally resonant, visually stunning tales to life, both through traditional artistry and state-of-the-art AI tools. Offering expert 2D animation services and 3D animation services tailored to your needs.
Whether you’re looking to start an animated YouTube series, produce a cinematic short film, or create an animated video for your business, we have the team and equipment to make your concepts become a reality.
Absolutely! Although traditional Ghibli-style animation requires artistic ability, now you can utilize AI tools and prompt assistance to design Ghibli-like graphics even without drawing experience.
Not necessarily. There are free and affordable tools like Stable Diffusion, ComfyUI, and Midjourney (for stills). But for professional-grade results, animation studios can help refine your vision.
Definitely. Most creators create channels around emotionally engaging, story-driven animations with a Ghibli aesthetic. BuzzFlick can assist in converting your scripts or concepts into animated YouTube videos.
Depending on the complexity, days or weeks for a short animated sequence. AI systems can accelerate the process, but refining details still takes time. To get the exact time frame, contact our teams nd share your preferences and get a detailed roadmap, custom quote, and time frame.
Yes, absolutely! We can refine your AI-generated frames, improve them, animate scenes, and match everything with sound design and storytelling aspects.
You know those super old cartoons? The ones where characters have arms and legs that bend and stretch like they're made of rubber? That's not...
Read More
Get A Custom Quote Now
Copyright © Buzzflick 2026, All Rights Reserved.
Get Video Animation at Reasonable Prices at BuzzFlick! Get A Quote!
![Top 10 Stop Motion Animation Apps for iOS and Android [2025 Edition]](https://buzzflick.com/wp-content/uploads/2025/10/Featured-Image-Top-Stop-Animation-Apps-for-iOS-and-Android-600x339.jpg)